Garage door control with shelly
As a recent homeowner, I couldn’t resist the urge to automate everything that could be controlled. Today, my garage door was the victim of my automation obsession.
Intro
In my new house I have already installed Shelly devices on 80% of the lights. Other lights are already smart and the leftover are lights that lack enough room behind the switches to install a Shelly. Two window blinds also made the automation frenzy, where the output of the solar panels are used as outdoor light sensor. The brains behind it, home assistant and node-red.
The garage door was also on my to-do list for automation, but security concerns held me back. Our home was delivered with a Krial White series motor, which appears to be a rebranded Tormatic. A smart home kit that includes another specialized hub and sender module can be purchased for €275, and it comes with a free app. As I try to keep things locally controlled and reasonably priced, I decided not to go for this option
The remote
We received two remotes with the garage door, each with three buttons. However, upon delivery, only one button had functionality: open => stop => close. The other two didn’t do a thing. My initial idea was to use the spare buttons to trigger other automations around the house. Although I was aware that these remotes use rolling codes that cannot be easily replayed, I plugged in my HackRF, fired up URH, and began measuring the ether.
With the code W-433 on the back of the remote, I captured the spectrum around the typical 433Mhz frequency used for remotes. And found signals with amplitude shift keying (ASK) modulation. 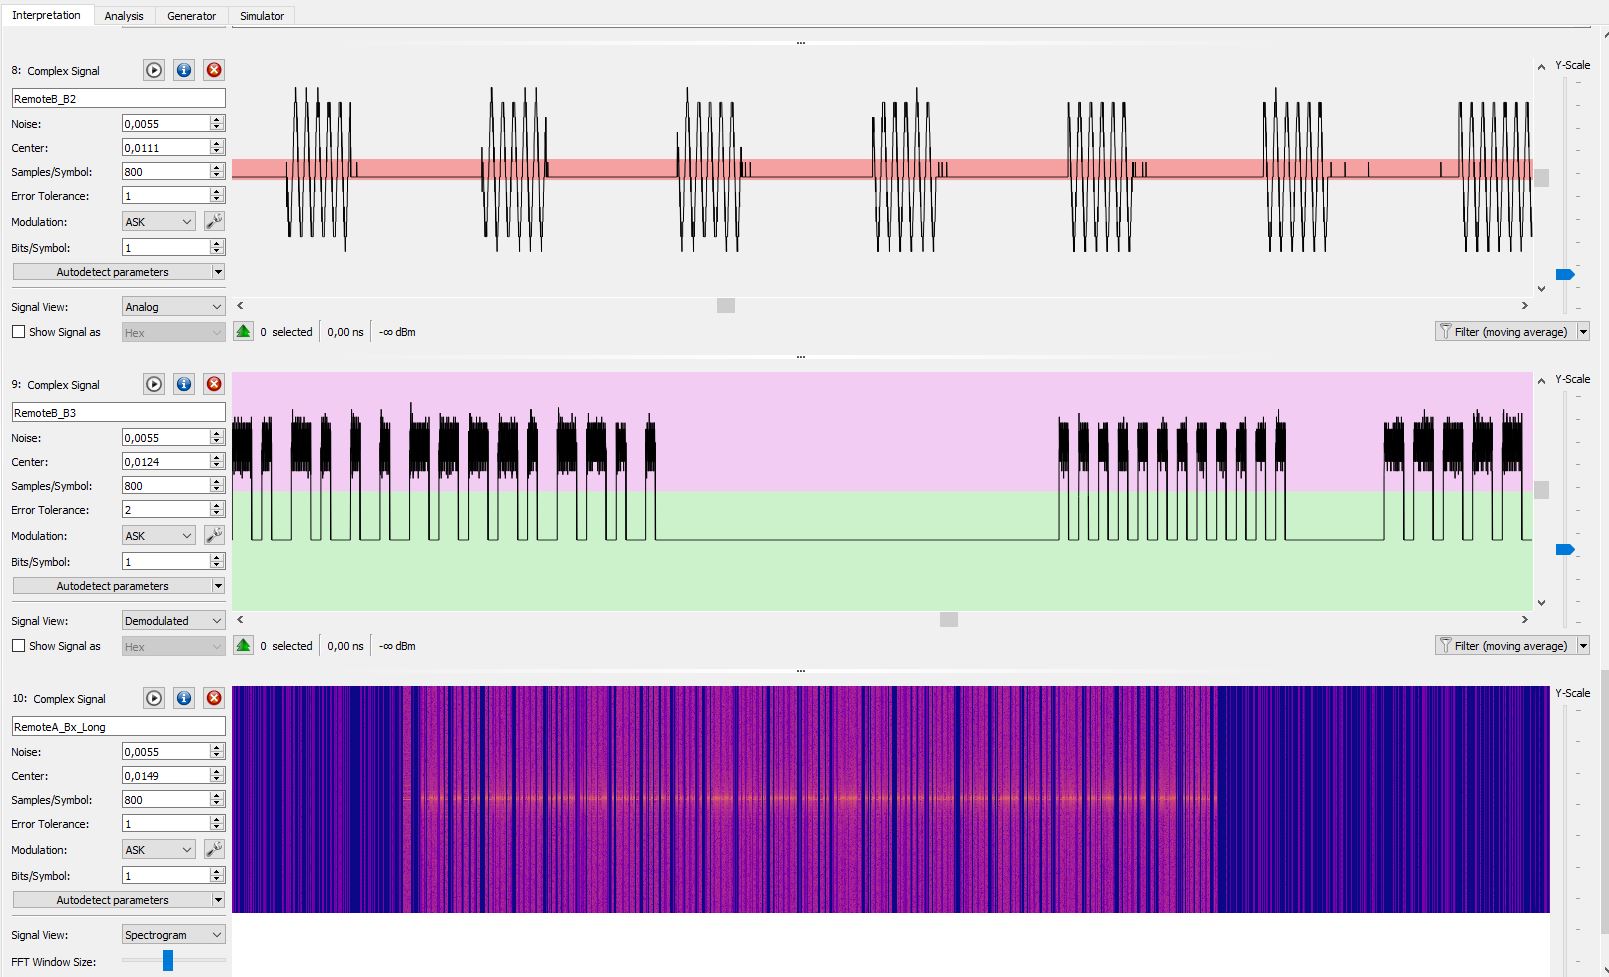
To decode the signal, a simple Morse code decoder was sufficient to convert short pulses to zeros and long pulses to ones. 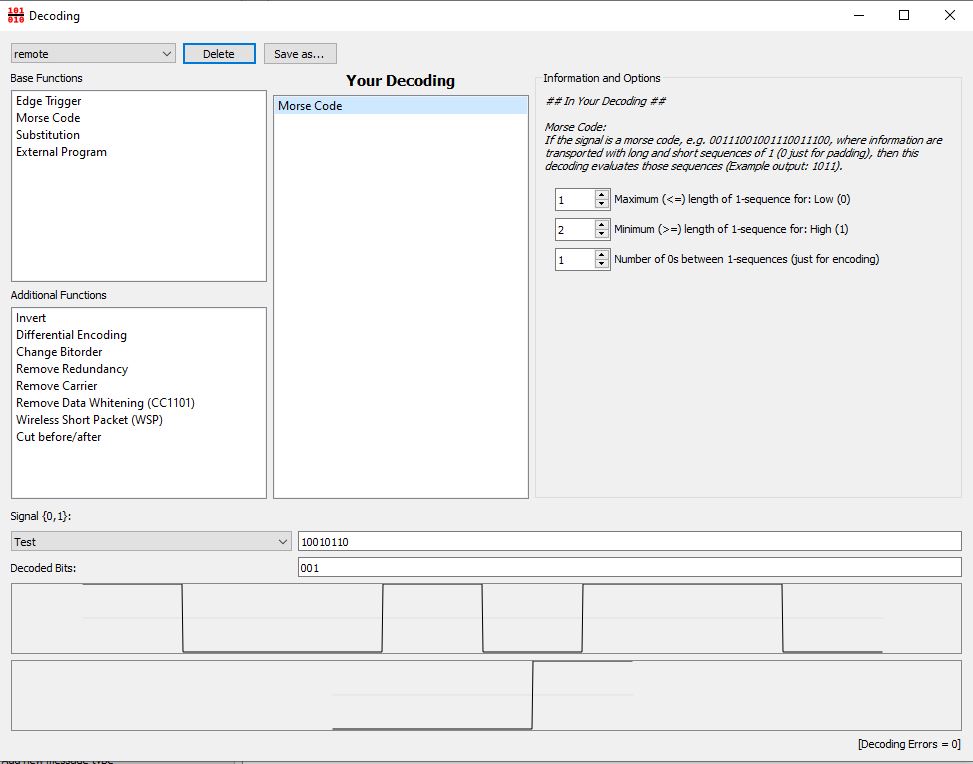
URH comes equipped with an analyzer that helps you identify patterns in the bitstreams. Once I set some rules to label the gaps and clock sync pulses, I was left with the data from the remotes. After capturing enough button presses from both remotes, it became evident that a portion of the data (blue data) was some form of identification and remained the same for each remote. One byte (yellow data) changed depending on the button pressed. All other data was random and likely represented the rolling code that changes with each button press. Cracking that code is beyond my skill level. 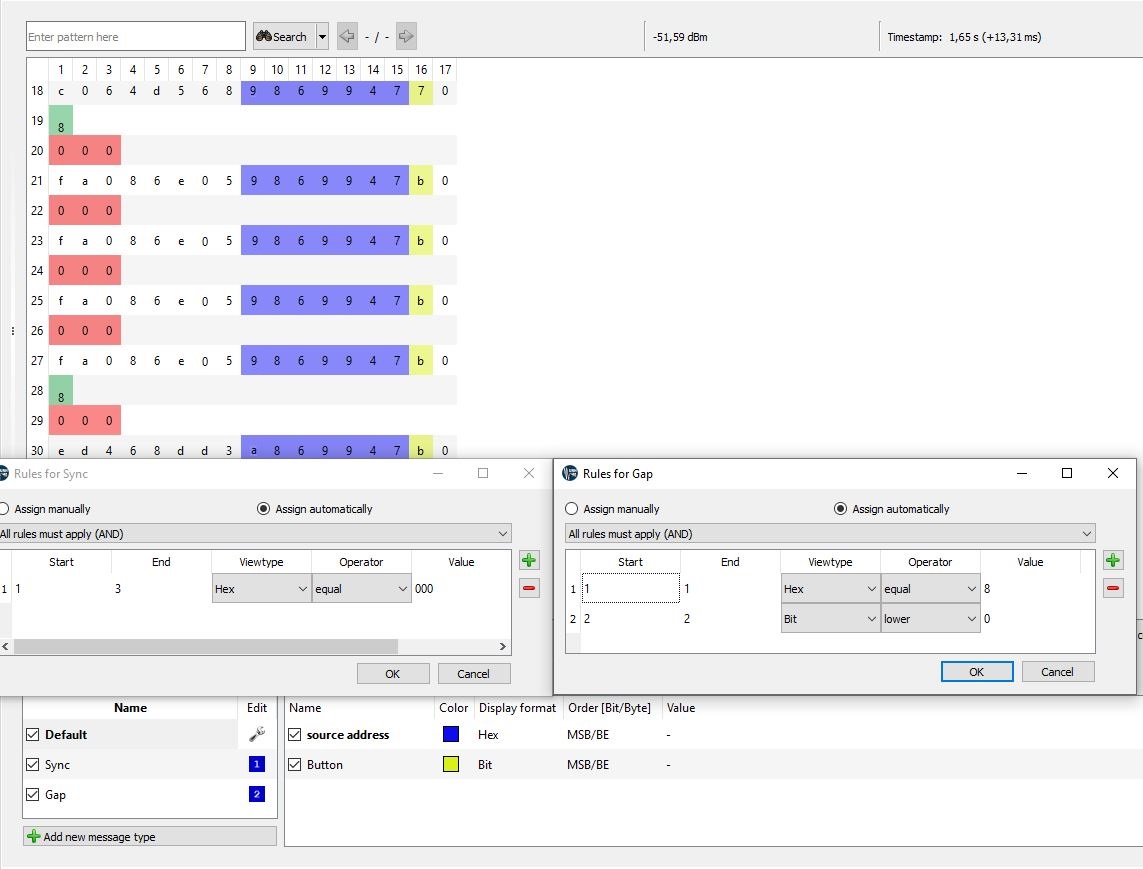
Theoretically, this knowledge could be used to construct a device capable of identifying a remote and button press, and then transmitting the data to my home assistant. However, the challenge of finding the correct parts and finding the time prevented me from arriving at a solution.
The garage door
Before continuing, I will answer a question some of you will have: Why?
It’s not my intention to have full control over my garage door from everywhere in the world, because I know that you then rely on layers of technology who each could be compromised and hacked. If somebody hacks my lights, fine have fun. I don’t have epilepsy, so let them flash! But the idea that someone on the other side of the world could open my garage. That’s a no.
But imagine you left home without closing the garage. I haven’t done that yet, but it could happen. Wouldn’t it be great to get a message saying that the garage is open for too long and ask if it can be remotely closed?
Fast forward a few months, and I finally decided to go through all of my appliance manuals. Initially, I just wanted to check if my water softener was working correctly, but I ended up learning more than I anticipated. For example, I discovered that my kitchen hood’s built-in light could be dimmed. The garage door manual also caught my eye, and this time I read everything. I learned that it was possible to assign light control to one of the buttons on the remote. Additionally, I discovered extended functionality for partial opening or ventilation opening. The latter option sets the door in a position where there is only an opening at the top for air to come in and automatically closes again after one hour. This feature could also be mapped to a remote button. Ultimately, I had a remote with three buttons assigned to three functions: open-close, ventilation, and light. The idea of using the remote for something else was immediately dropped.
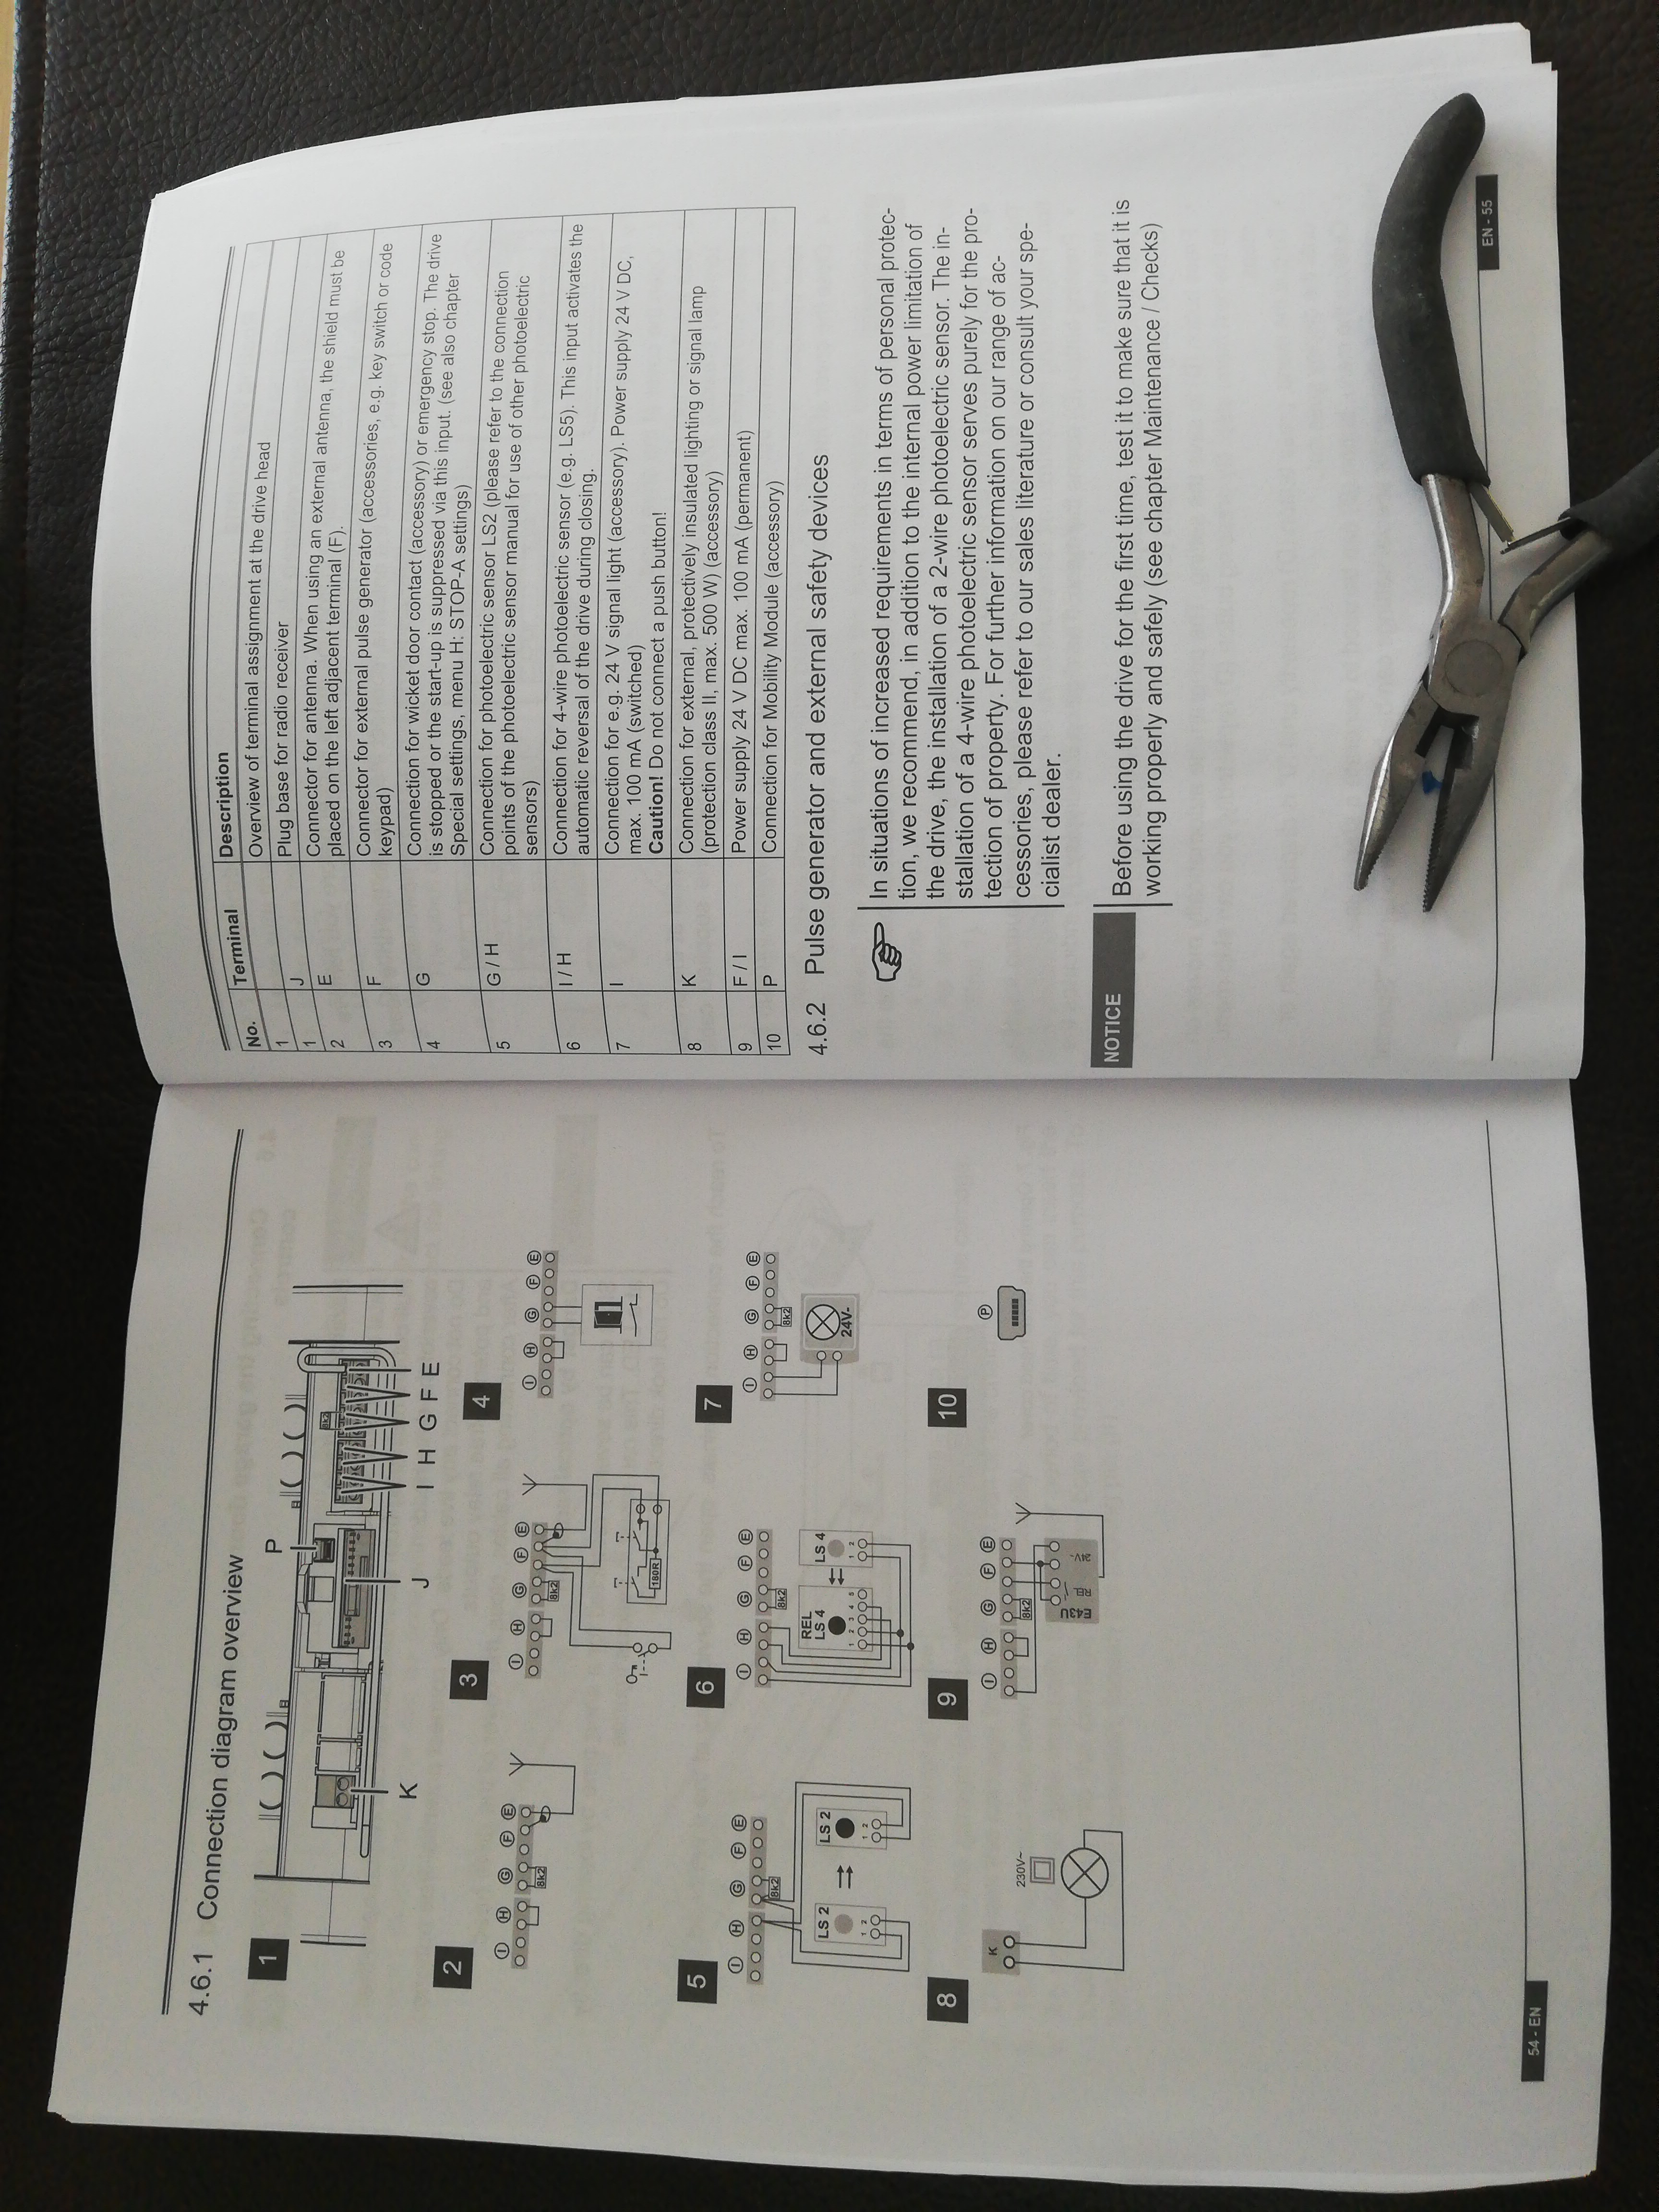
One curious thing in the diagrams was the 180Ω resistor in series with a button. It wasn’t explained what it did, but I could only hope. And after testing: Yes, it triggers the extended functionality similar to the remote. This means I could trigger ventilation mode any time I want. It doesn’t matter if the door is open or closed, pressing it will let the door position go between ventilation and closed. Both positions are good enough if you forgot to close your garage. And it will eventually always fully close after the 1 hour timeout. As Automating ventilation could also become interesting in the warmer summer days, I became hooked.
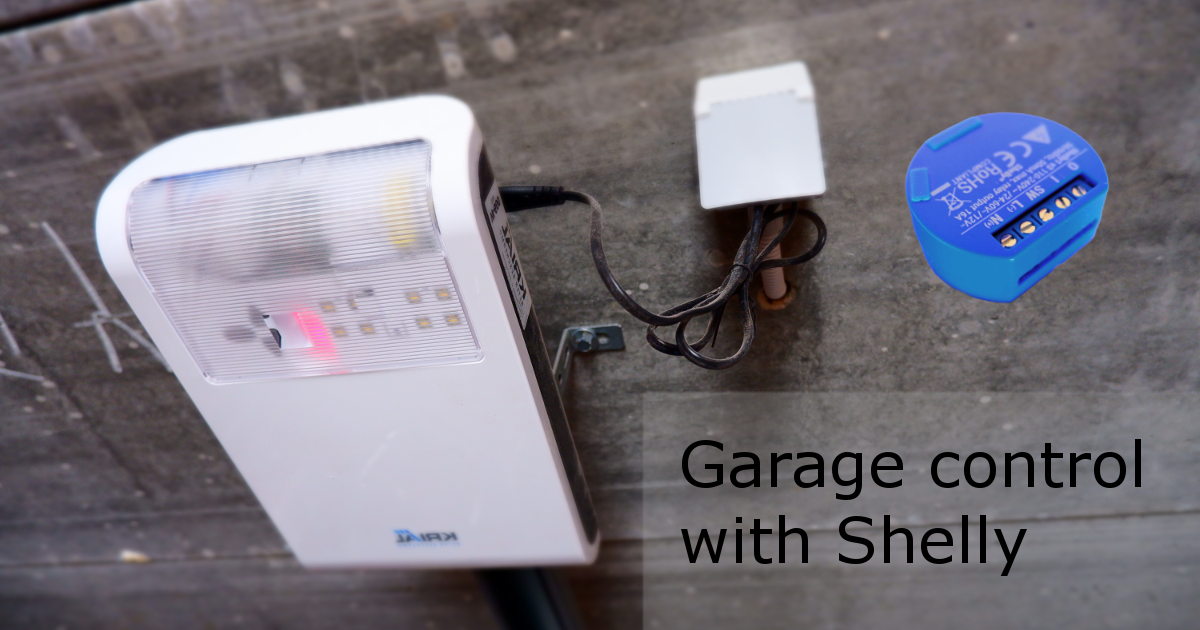
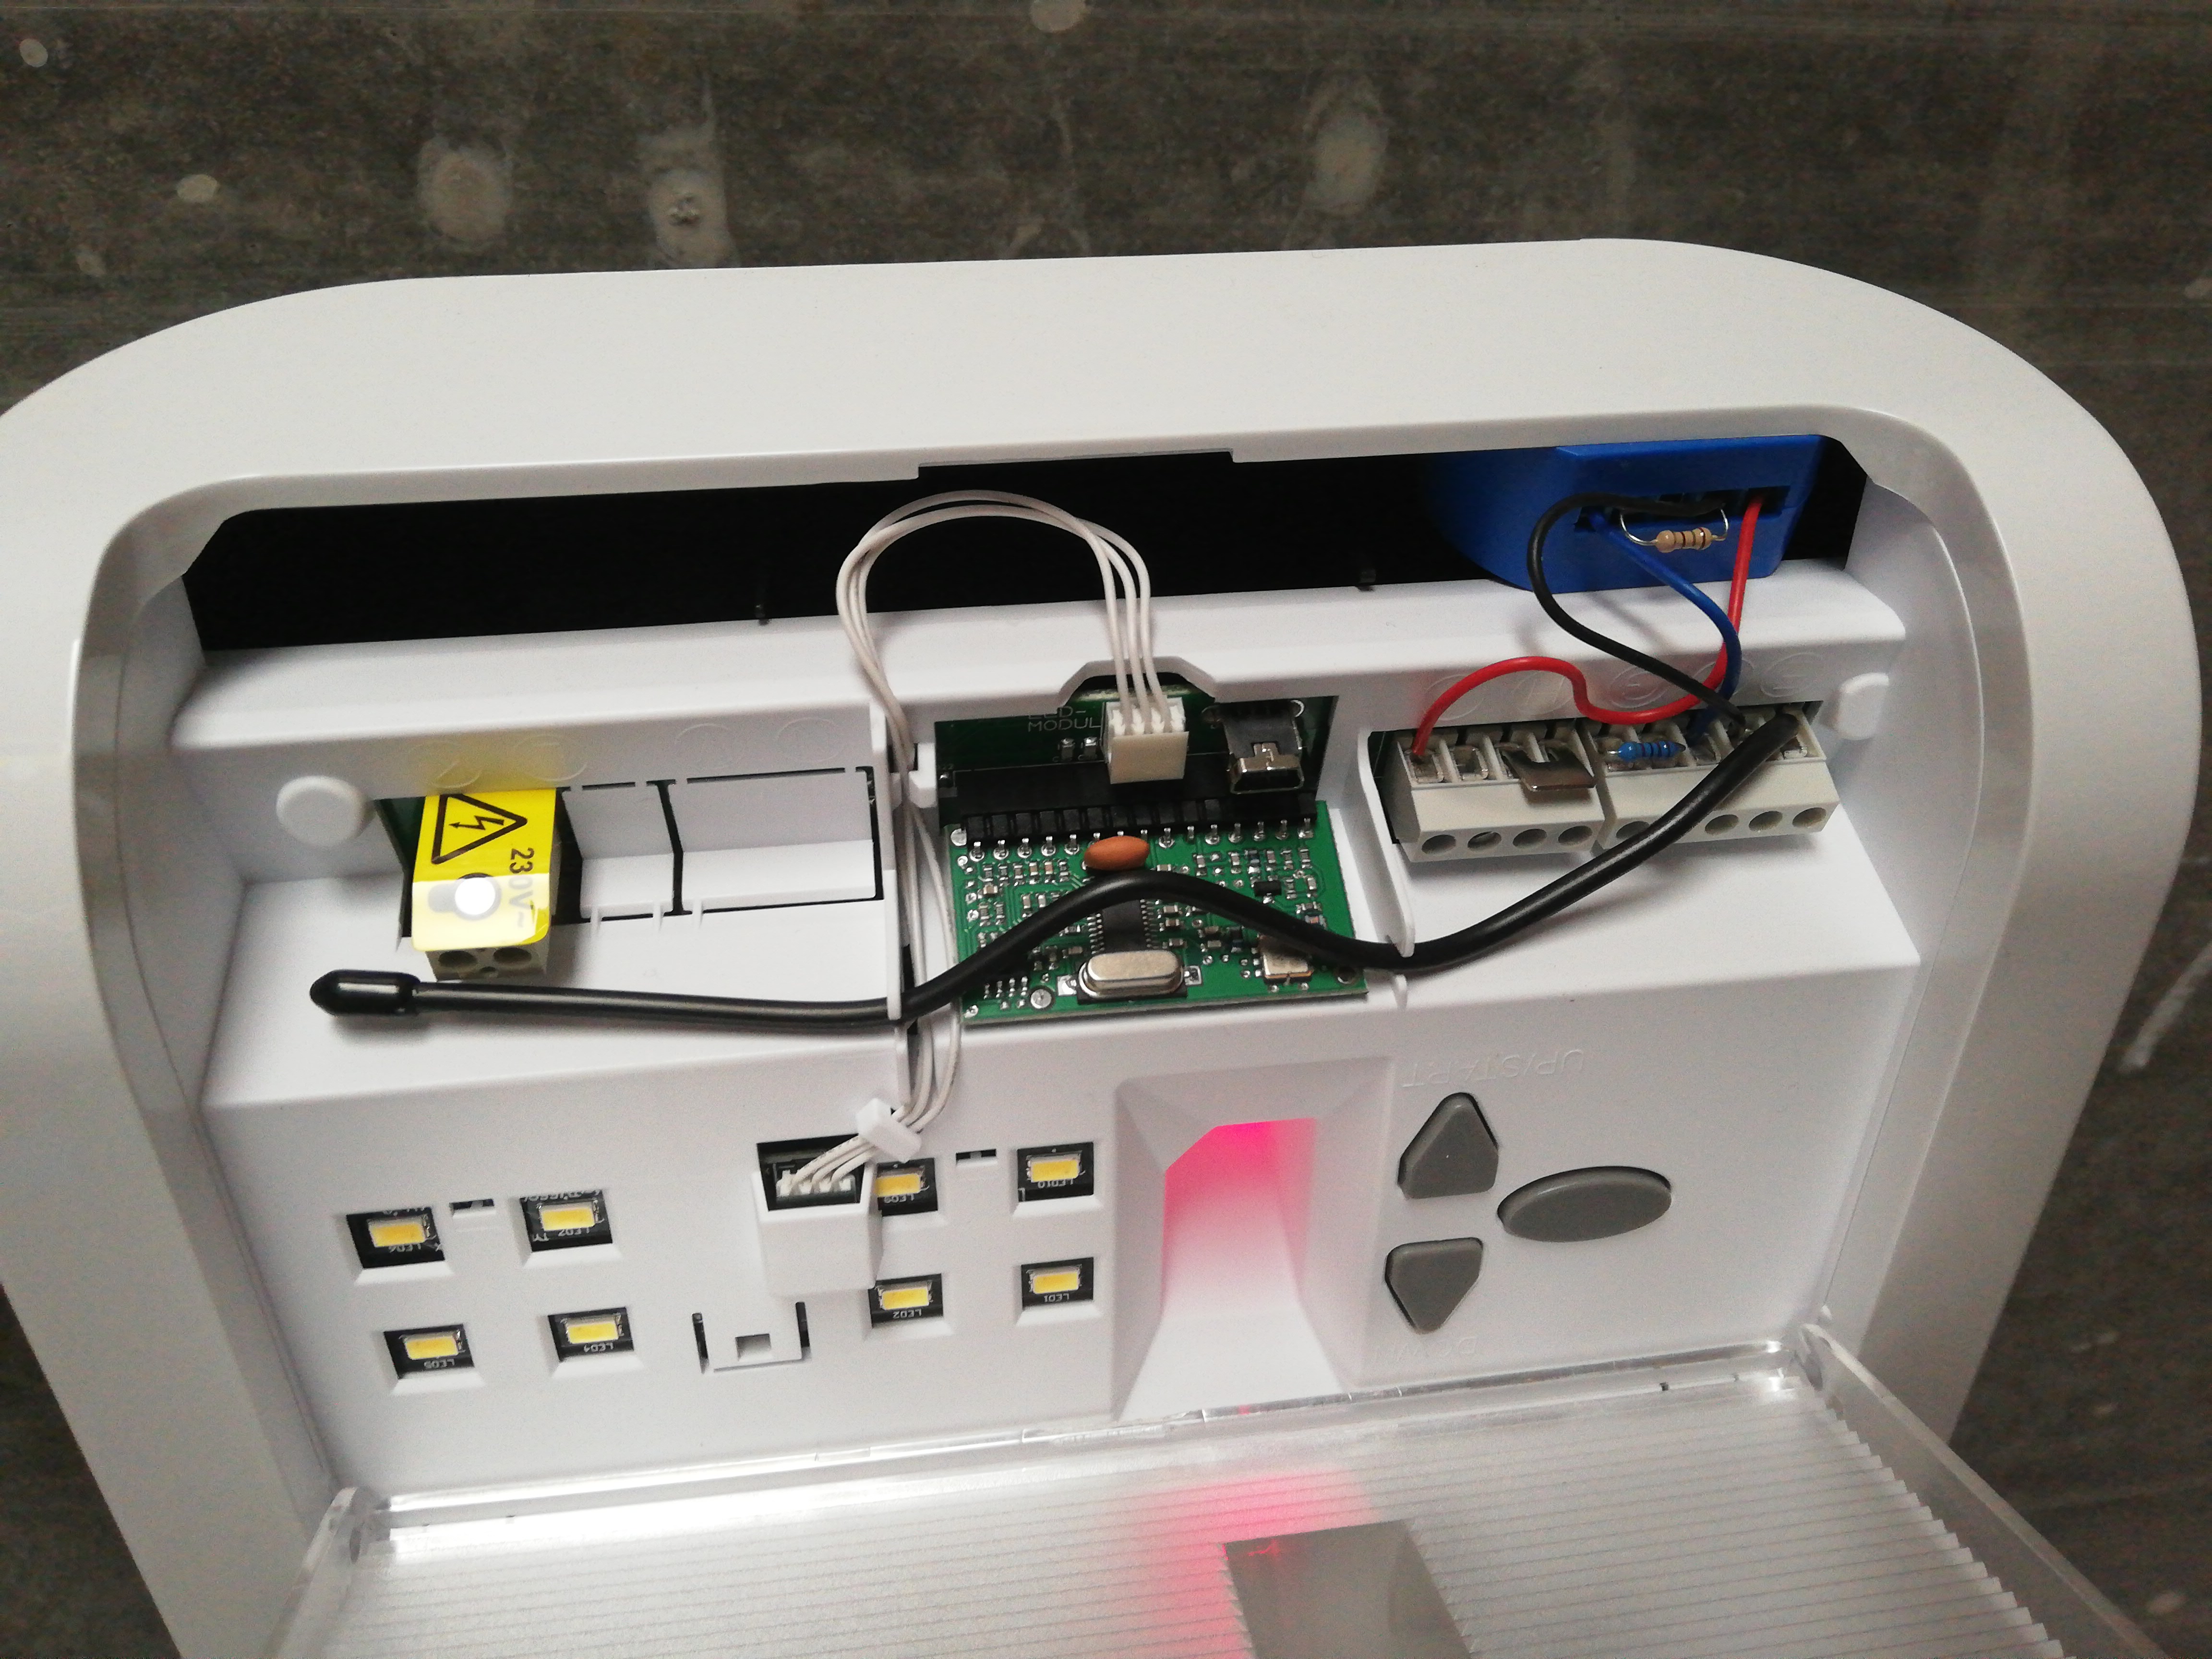
Now it was only a matter of connecting a Shelly-1 to it. I thought I needed more materials and tools than what I had lying around to build it properly, but boy, I was wrong. It was like they made it to accommodate a Shelly module. A 24V power source was available to power the module, and they even left just enough space in the casing to squeeze a Shelly in between. With only three wires, a resistor, a WiFi module, and 5 minutes of work, I had a solution instead of spending €275 on a smart home kit. I was happy.
In the future, I will add a sensor to the shelly to detect if the garage door is fully closed. But the current solution can already be used. Don’t think a problem is too hard to solve because many times there is a simple solution waiting around the corner.